- Babyface with firmware >200 and activated Class Compliant mode
- Any Apple iPad with at least iOS 5. iPhone and iPod Touch can not be used.
- Apple iPad Camera Connection Kit (Dock or Lightning to USB)
Having tested several chinese replicas of the Apple Camera Connection Kit, from 2-in-1 to 5-in-1 adapters, we strongly recommend purchasing the original!
All adapters seemed to work for the simple application of copying photos. Attempting to run the UCX or Babyface with USB Audio 2.0 was when the problems started. Some of the tested adapters would not work at all, others only with short cables, and only one adapter came close to the quality of the original. But as soon as 8-channel recording or 96 kHz playback was initiated, the Apple Kit always performed much better.
We also recommend the purchase of a dock-to-dock extension cable, to avoid having the CCK attached to the iPad directly with the heavy USB cable hanging down.
This can cause the CCK to slip out of the iPad's connector, or to be in the way most of the time. An extension cable provides enormous freedom of movement. We are working with cable lengths of 50 cm and 1 m, both work flawlessly. These cables are available as DeLock iPhone extension cable, or Dock Extender, e.g. from Amazon.

Dock Extender Cable Dock Extender Cable
It is important to note that each individual component is responsible for stable operation of Babyface and iPad. As an example, a setup with an iPad connected to a 1m DeLock cable, CCK, 5m USB connection to the Babyface only worked with the original Apple CCK. Not only for simple iTunes stereo playback, but also with 96 kHz playback and 8-channel recording. In this setup, the USB cable could even be replaced with a 10 m active one. With lower quality cables or CCK replicas, even 50 cm dock to dock to 1 m USB would be considered success ...
Class Compliant Mode under Windows and Mac OS X
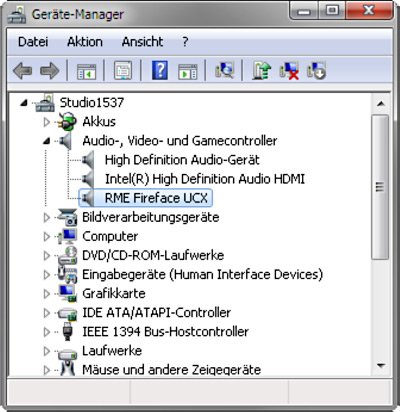
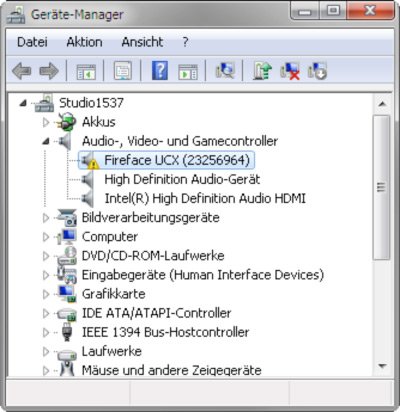
On a Windows PC, Class Compliant mode is indicated by a missing "RME" in the device name shown in the Device Manager. In the correct mode and with installed drivers, the full name including RME is shown, without serial number.
Windows Device Manager (with driver)
Windows does not support USB Audio 2.0 directly. The Babyface will be detected when in CC mode, but automatic driver installation will fail. This is important to remember. Connecting it to the PC one day after having it used with the iPad one you might forget that it is still in CC mode (although the rising level meters during power on show exactly that). You might end up with hours of wasted time trying to repair your driver installation - when all you need to do is set the unit back to normal mode.
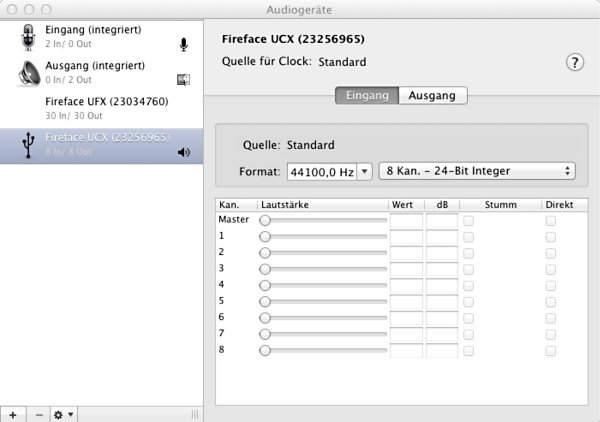
Mac OS X audio/MIDI setup
Mac OSX supports USB Audio 2.0, even with more than 2 channels. The Babyface offers full 10 input and 12 output channels at up to 192 kHz. It is shown as "Babyface (xxxxxxxx)" in the Audio MIDI Setup, in both normal and CC mode. In CC mode the USB Settings will vanish from the Dock, and TotalMix will - if at all - show a disconnected Babyface.
The Audio Window in the Audio MIDI Setup lists two available modes: 2 channel and 10/12 channel. The sample rate shown here as 'Default' is the one set at the Babyface (see below).
Alsa (Linux) does not work with USB 2 Class Compliant interfaces at this time, but it seems it can be fixed (recompiled) to do so. More information is available here:
http://www.mail-archive.com/alsa-user@lists.sourceforge.net/msg28901.html
In Mac OS X, either the first two or all channels will work, depending on the choice in the Audio MIDI Setup. The output signal of channels 1/2 can be copied to outputs 3/4 by the Babyface onboard mixer.
When connected to an iPad, the analog mic/line input 1 works with mono apps, inputs 1 and 2 with stereo apps (both dual mono and stereo), and up to 8 inputs with 8-channel applications like MultiTrack DAW and Music Studio. Garage Band supports all 10 inputs, but only two at a time. Auria can record all 10 inputs simultaneously. Playback will use analog outputs 1 and 2, or even more channels if the app supports such operation. The Babyface onboard mixer can copy the output signal 1/2 to outputs 3/4, SPDIF and ADAT, for easier monitoring (Copy mode).
In Class Compliant mode the default clock mode is AutoSync at 44.1 kHz. The Babyface (and with it the iPad) will be synchronized to an external digital sample rate if there is a valid digital input signal. Without an SPDIF or ADAT input signal the Babyface is in master mode and uses the sample rate set by the Mac OS X or iOS (the app in use). The Babyface can be set to fixed Master mode as well, but the set sample rate is ignored, as the iPad (the current app) controls the sample rate value.
While the MIDI I/Os will send and receive Sysex messages, not all apps are ready to do this. For example MIDI Monitor and AC-7 do not support Sysex at this time. The app Midi Tool Box can be used to verify that the Babyface is working correctly, and the problem lies somewhere else.
In stand-alone mode, the unit operates as AD- and DA-converter. The clock modes are the same as in CC mode, but here the chosen sample rate is indeed used by the unit. To recap what AutoSync means:
- Without further configuration and no digital input signal, it will default to 44.1 kHz internal sample rate.
- When receiving a digital input signal in SPDIF format, it will sync itself on the external sample rate, from 32 kHz to 192 kHz.
- When receiving a digital input signal in ADAT format, it will sync itself on the external sample rate, from 32 to 48 kHz. Double Speed mode is automatically set when receiving an ADAT signal from other RME devices. Otherwise the setting has to be performed manually (LEDs 8 or 9, see below).
Operation at the unit is very similar to the one under Windows and OS X, with some additions for the new modes. These were done as intuitive and easy to remember as possible, but with three elements to operate only there must be some compromises.
DIM
Select Out or Phones, then push the encoder. In DAW mode (see below), DIM affects the line outs only (channels 1/2), reducing level by 20 dB. In Copy mode DIM affects the phones output as well.
Recall
Adjust desired volume with the encoder. Press Recall for 2 seconds to store the current value. In DAW mode, Recall affects the line outs only. In Copy mode, Recall affects the phones output as well.
48V Phantom power on/off
Use Select key and select "In"
Push the Encoder to select the desired channel (left, right, both)
Push and hold the encoder until the orange 48V LED(s) turn on/off.
Hi-Z instrument input on/off
Use Select key and select "In"
Push the Encoder until Level Meter Mode is active (no channel selection).
Push and hold the encoder until the pale orange LED in channel 2 turns on/off.
Switch Output Routing / Monitoring
Use Select key and select "Phones"
Push and hold the Encoder until either the right or left level meters run up. Left meters: Copy mode.
The signal of output 1/2 is also routed to channel 3/4, and channels 1/2 of the ADAT or SPDIF output.
Right meters: DAW mode, output routing 1:1.
All this is quite easy to remember, as it is logical and uses steps that are directly related to the desired functionality. The only exception is the switching between SPDIF and ADAT, you just have to remember how to
Switch digital output format (SPDIF <> ADAT)
Press and hold the Select button until the left or right LEDs run up. Left meters = ADAT output mode.
Right meters = SPDIF output mode.
The last available setting might look quite complicated or cumbersome, but it is done not so often, and many users will never do it at all:
Set Clock Mode and Sample Rate
Use Select key and select "Out"
Push and hold the Encoder until one of the nine level LEDs on the left is lit. Turn the encoder to select one of nine modes:
9: AutoSync, Quad Speed mode in case input = ADAT (4x SMUX)
8: AutoSync, Double Speed mode in case input = ADAT (2x SMUX)
7: Master 192 kHz
6: Master 176.4 kHz
5: Master 96 kHz
4: Master 88.2 kHz
3: Master 48 kHz
2: Master 44.1 kHz
1: AutoSync
This mode can be exit either by pushing the encoder knob again, or using the Select key.
The unit has setting 1 as default, working with 44.1 kHz in stand-alone mode and automatically syncing to an SPDIF or ADAT input signal if present. In CC mode, the sample rate value is ignored, as it is set by the app currently used on the iPad. Still the unit can be set into fixed clock mode 'master' by selecting one of the Master settings.
This setting can be quite useful. When pulling the dock connector from the iPad, the Babyface immediately enters stand-alone mode - and would turn to the sample rate that you prefer.
All settings are stored within the unit and do not get lost until the next time CC mode or standalone mode is used.
Here are two examples of setting up and using the Babyface in stand-alone mode.
Universal DA-Converter
Connect the Babyface via SPDIF to your CD-player, MP3 player or whatever device playing back audio at up to 192 kHz. Comfortably adjust the hearing level with the big rotary encoder. Push the encoder for a quick mute, or use Recall for a typical listening level. Use the Copy mode to use either line outs, headphone out, or both at the same time.
Analog Microphone Preamp
Need two more microphone preamps with phantom power but only have line inputs? No problem with the Babyface in stand-alone mode!
Set the Babyface to Master 192 kHz for widest frequency range and lowest delay. Connect optical input with optical output by a TOSLINK cable (loopback). Activate phantom power, then set the gain as needed. The analog input signal is amplified to line level and available at the XLR line outputs, and with Copy mode activated also at the phones output.
Stand-Alone Mode
As one wants to place the USB power supply not beside the Babyface, but further away into a power outlet, a cheap USB cable extension, male to female, might be used to bridge the distance. Unfortunately our (and our customer's) experience is that most of these USB extensions are not only cheap, but cheap. They cause a voltage drop that is enough to let the Babyface not initialize correctly, or malfunction in certain situations. The workaround here is to still use an external power supply. Once the Babyface is started the external power socket works. You can use a badly working extension cable just to turn on the unit via USB buspower. After that it will get all the power that it needs from the external power supply via the Babyface power socket.
Class Compliant Mode
You might get tempted to not use any external power supply at all. Indeed the Babyface runs bus powered via typical USB power supplies quite well. Unfortunately some current intensive situations like switching phantom power on, or plugging a condenser mic into the already powered mic input, can cause a communication dropout. It seems like the spike of drawn current is detected by the iPad and causes it to shortly disable the CC-device. Therefore we strongly recommend to always use a stable external power supply. Then such effects do not show up with the iPad.
Mobile Operation
USB buspower can be delivered by a rechargeable battery as well. These days LiPo batteries with USB ports are very popular, usually used to charge your mobile gadgets on the go. They are lightweight, have an astonishing capacity, can be recharged quickly many times, and are not expensive. And they have a USB port. We tried one of those small 4,200 mAh for around 20 Euros. The Babyface worked for more than 6 hours while playing music from the iPad.